
May 21, 2024
Upgrading to Universal Analytics
By Megalytic Staff - June 13, 2014
Today, your audience accesses your website from multiple devices – desktops, tablets, phones, game devices and maybe even other consoles. With so many new user touchpoints, the measurement challenge for marketers has grown. We need to understand user behavior across these devices.
Google’s upgrade to Analytics addresses these challenges. This post describes why you should upgrade and how to do it effectively, even if you have a complex site with lots of custom tracking code.

What Is Universal Analytics?
Google’s upgrade to Analytics is named “Universal Analytics”. Already widely adopted during the beta program, it was released into primetime on April 4, 2014.
There are two important components to Universal Analytics that you should be aware of: upgrading your account and retagging your site.
Upgrading to Universal Analytics is simple. However, retagging can be more complicated if you have a lot of custom tracking code (e.g., event tracking).
Companies should upgrade to take advantage of powerful new features – primarily the enhanced ability to measure user behavior across sessions and devices. If you do not upgrade voluntarily, eventually (no deadline yet) Google will automatically upgrade your account. At some point, classic Google Analytics will be phased out.
You want to be ready for Universal Analytics before the mandatory migration happens.
How to check if you already have Universal Analytics
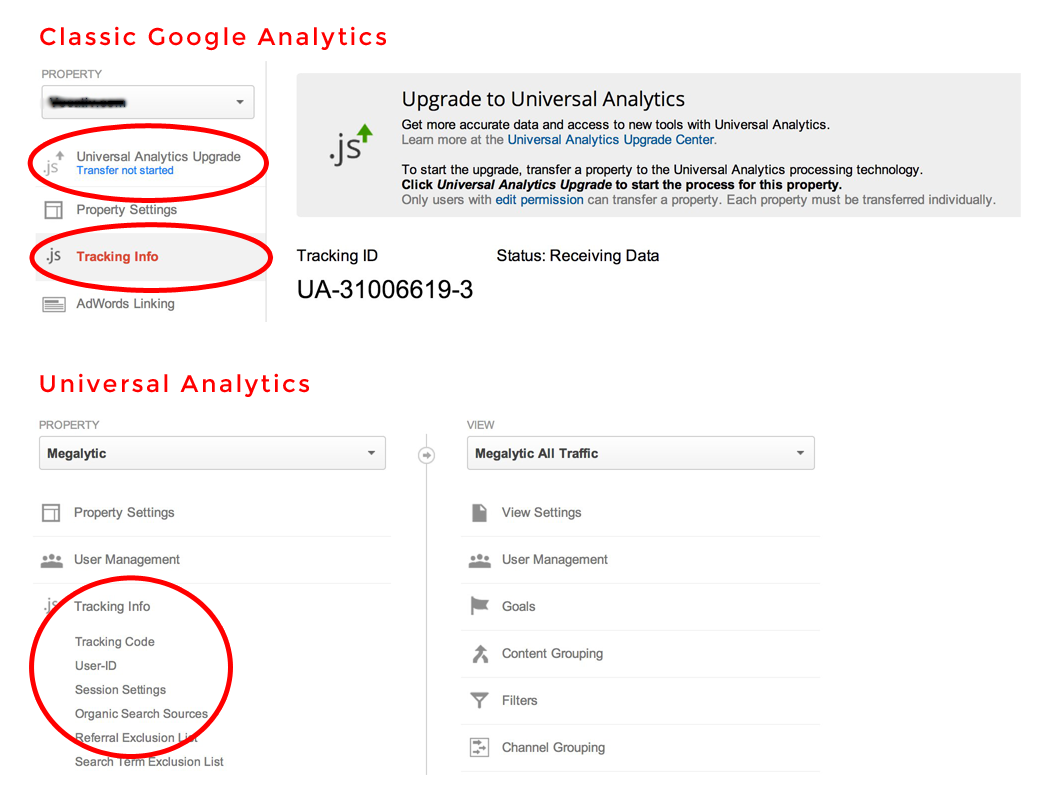
When viewing the Google Analytics user interface, it is hard to tell if you are running Universal Analytics or the older version, now referred to as “classic Google Analytics”. To tell for sure, log into your account, open the Admin page and choose the property you want to check from the Property dropdown.
In the center column, under the PROPERTY heading, look at the top option. If you see Universal Analytics Upgrade / Transfer not started , you are still running classic Google Analytics.
If you don’t see that at the top of the column, you are probably already running Universal Analytics.
Another way to check is to look at the center column in your Admin panel and look for an option labeled either Tracking Code or Tracking Info.
If you see Tracking Code , you are still running classic Google Analytics. If you see, Tracking Info , click on this option to expand it.
If an area opens on to the right with the title “Upgrade to Universal Analytics”, then you are still running classic Google Analytics.
Otherwise, you are already running Universal Analytics. In this case, the Tracking Info option contains a submenu of new Admin settings such as User-ID, Session Settings, and Organic Search Sources.
The differences are shown below.
Google has been changing the options on the Admin page lately, so you may also want to check their official documentation: See if you use Universal Analytics .
Why upgrade?
Sometimes, we can tell a lot from a name. Google is calling this release “Universal” because it consolidates the tracking of users across the various devices they use to reach your website. But there are a lot of other benefits as well. Here are our favorites.
Better User Tracking
In our opinion, this is the primary benefit up upgrading - enabling better understanding of User behavior. (see our post Stop Tracking Visits. Start Tracking Users ). With Google’s new User-ID feature, you can recognize single users accessing your site from various devices. It is hard to overstate how beneficial this is. For example, users may first discover your site on mobile when someone shares a link on Twitter or Facebook. However, they might need to be on a desktop to use your advanced features or make a purchase. In that case, it is critical for you to be able to understand what drives your users from discovery on mobile to conversion on desktop. The User-ID helps you accomplish that.
Once you have set up the User-ID, you get access to new Cross Device Reports that provide insight into user behavior as they access your site from various browsers and devices.
Better Developer Productivity
Do you track goals, events, or eCommerce transactions? Then you know that it requires developer time to add that tracking code to your site and mobile apps. And more developer time is required to maintain this tracking code as your site or app evolves. Google has upgraded all three of the tracking code libraries to make them more developer-friendly:
- The analytics.js JavaScript library for websites.
- The Google Analytics SDKs for Android and iOS mobile app tracking.
- The Measurement Protocol for other digital devices, like game consoles and information kiosks.
Here’s an interesting video that shows how the Measurement Protocol was used to track movements from the Xbox Kinect.
http://youtu.be/nCeJITfEhSk
For the full article, see: Using Universal Analytics to Measure Movement .
More End User Configuration
Universal Analytics allows you to change important aspects of your tracking code behavior without involving a programmer. You now have better control over organic search classification, session and campaign timeouts, referral exclusions, and search term exclusions.
For example, you can tweak organic search to separate out traffic coming to your site via Google Images vs traffic from the regular Google Search results. Fine-tuning search analytics like this can be important because different types of users reach you from different types of search. Those coming from an Image search may be looking for an interesting infographic to use in an article they are writing. In contrast, users coming from a text search are more likely to be interested in your content.
Control over session and campaign timeouts will help session and campaign reports line up better with actual user behavior and improve attribution. We describe the timeout configurations below in the section below: Setting Session and Campaign Timeouts .
Custom Dimensions & Metrics
This is a big improvement on the Custom Variables feature that has been available in classic Google Analytics for some time. This feature lets you introduce your own site-specific dimensions and metrics to tailor your reports to measure what matters most to your business.
For example, we use a Custom Dimension to track trial vs. paid user behavior on our site. Custom Dimensions are an upgrade of Custom Variables that make it much easier to access your custom data in reports (both standard and custom reports).
Custom Metrics are an entirely new feature that gives you the ability to create your own metrics specific to your site or application needs. For example, in this post, Yehoshua Coren describes how to use Custom Metrics to measure gross profit per product on an eCommerce site: Measuring Profit using Google’s Universal Analytics .
Stay Current
It’s not just the latest fashion. All new and improved features from Google will only be released for Universal Analytics. There is no announced timeline, but classic Google Analytics is being phased out. We recommend that you start conversions now. If you are an agency or consultant, start prodding your clients to convert to Universal Analytics. If you wait too long, you may be scrambling to convert over a lot of tracking code at once and you might find yourself short of developers to get the job done.
Better Insight from Better User Tracking – An Example
We said above that we think that better user tracking is the primary benefit to upgrading. The key to user tracking in Universal Analytics is the User-ID. Using the User-ID, Universal Analytics can stitch together visits from the same user on these different devices and provide insight into overall behavior. To understand how the User-ID is used, and what its benefits are, consider this example.
A new visitor, Sally, may learn about your shopping site from a promotion on Facebook. Sally goes to your site on her mobile phone and signs up for your “daily deals”. This is an opportunity for your mobile site to set Sally’s User-ID in Universal Analytics. Setting the User-ID usually requires some kind of login.
Two days later, when Sally is getting ready for work, she logs into her desktop at home to quickly check email. She scans a “daily deals” email from you and clicks a link to check out your specials. Sally likes what she sees, and logs in to your site to put some merchandise in a shopping cart. Based on this login, Universal Analytics associates the same User-ID to this visit that was used to track Sally’s mobile visit two days earlier. At this point, Sally realizes she is late for work, so she forgets to checkout and heads out the door.
Later that afternoon, work’s getting a little slow, and Sally remembers that she didn’t check out from your site. Since the daily deals expire at 5:00pm, she logs into your site from her work computer and completes the checkout. Based on that login, Universal Analytics again associates Sally’s User-ID with the session that happened from her work computer.
In classic Google Analytics, your reports have no way of connecting Sally’s three visits and recognizing that these are all the same user. Looking at them, you would simply see a visit from mobile, and two visits from different desktops. In Universal Analytics, your reports can tell you that a single user visited your site three times over two days, first on mobile (where an account was created), second from a desktop (where a shopping cart was abandoned), and third from a different desktop (where the checkout was completed).
Stitching together these visits is the key to understanding the behavior of your users. Better understanding leads to better site design. For example, if you notice quite a few users like Sally, who click through from email in the morning before work and abandon carts, you might consider implementing one-click checkout. Or, sending a reminder email at 4:00pm letting them know that the deals in their cart are about to expire.
If you want to learn more about how the User-ID feature is implemented, and see detailed examples of the reports that are available in Universal Analytics, we suggest reading Justin Cutroni’s post Understanding Cross Device Measurement and the User-ID .
The Upgrade Process – Only Two Steps
Google really wants us to all upgrade. To that end, they have a well-defined process with lots of documentation. The main page outlines this process and branches out in many directions to cover all the details. See: Universal Analytics Upgrade Center .
The upgrade process is conceptually simple – only two steps. However, if you have a lot of custom tracking code – Step Two can be a lot of work. You will need to modify all the custom tracking JavaScript code on your site. Depending on how busy your development resources are this can be a stumbling block.
Fortunately, you do not need to retag all of your custom tracking code at once. Universal Analytics continues to support tracking code from classic Google Analytics. However, some important new features are not supported in the classic tracking code libraries. For example, you need to use the new libraries to take advantage of the User-ID that lets you track users across devices.
Below, we look at each step and offer some advice on how you can gradually upgrade tracking code on complex sites.
Step 1 – Account Transfer
Open the Google Analytics Admin page, select your Account, and select the Property that you want to upgrade. At the top of the middle column, the first item should be labeled “Universal Analytics Upgrade”. Click on it to start the transfer.
This is how the Admin page looks before and after the transfer.
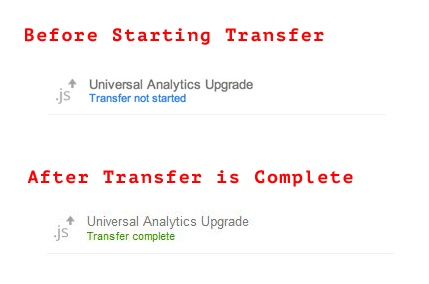
You need to wait until the transfer is complete before you start upgrading your tracking code. Google says that it may take as long as 48 hours.
Setting Session and Campaign Timeouts
During this time, you can customize your session and campaign periods. By default, they stay as they have always been (session = 30 minutes; campaign = 6 months).
Sessions timeout when there is no activity for longer than your timeout period. For example, if the user leaves a tab open on your site and does nothing for that period, then comes back and starts browsing again, Google starts a new session.
Likewise the campaign timeout determines how long Google will attribute conversions to a particular campaign. For example, if a user first reaches your site from paid search, but converts after a time that exceeds your timeout, then the conversion will not be attributed to that original paid search.
You can set these values for a Property in the middle panel of the Admin section as shown below.
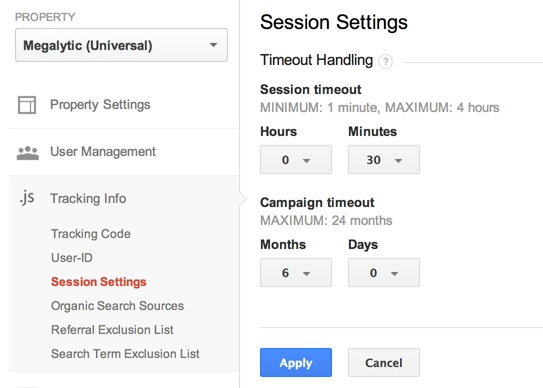
One reason to change the session setting is if your site has a natural timeout that is shorter (or longer) than 30 minutes. For example, some financial sites log a visitor out automatically after less than 10 minutes of inactivity. In this case, it makes sense to have the session timeout match, and be equal to 10 minutes.
Likewise, many types of campaigns do not have an attribution time horizon of more than a few days. For example, a promotional email is unlikely to be opened and generate a conversion 6 months after it was sent! So, you may want to reduce the campaign timeout to something more inline with the type of campaigns you run for your site.
Step 2 - Retagging
Once the transfer is complete, you can start transferring your tracking code from classic to Universal. Google calls this process retagging . While we cover some important aspects of this process here, we recommend reading Google’s documentation for sites with a lot of custom tracking code: Reference - Complete Web Upgrade: ga.js / dc.js to analytics.js .
As you contemplate retagging your site, you may want to consider migrating to Google Tag Manager (GTM). There are a lot of advantages to using GTM. For example, you can manage both Google and non-Google tagging in one place. GTM includes testing tools to help validate your tagging. It also makes it easier for third parties (like agencies) to update your tagging without having to edit code on your website.
Google provides a guide to retagging using GTM here: Reference - Complete Web Upgrade: Using Google Tag Manager . In this post, we focus on doing the retagging without GTM.
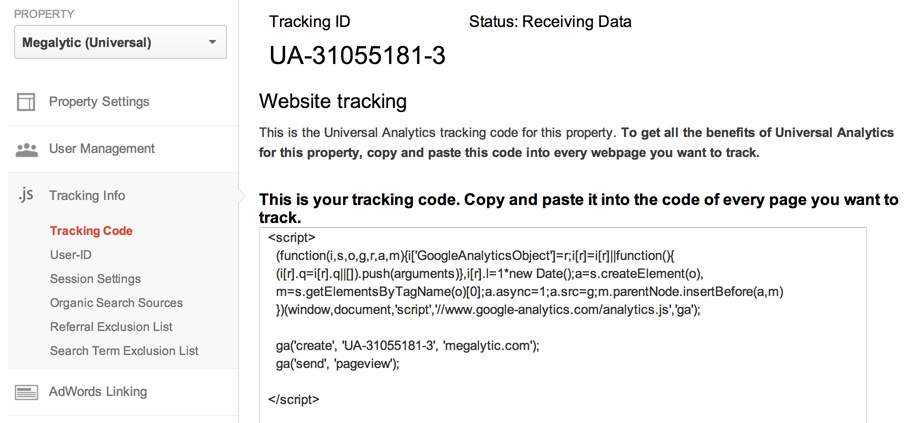
The first step is to change the Google tracking library that your site is loading. Under classic, you are using either the ga.js or dc.js tracking code library. Universal Analytics uses the analytics.js library. So, you need to update the code on your pages where you load these libraries.
To find the code for loading analytics.js , open your Admin page again, and look in the middle column under Tracking Info >> Tracking Code. You can copy and paste the code from the box on the right, as shown below.
In Google’s guide, they caution:
When upgrading to analytics.js, you must remove the basic ga.js snippets from your pages to avoid overcounting pageviews in your reports.
This immediately raises a concern. Your existing code will not work if you don’t load the library that it depends on. So, to follow Google’s advice, it seems like you have to upgrade all your custom tracking code at once. If you have a lot of custom tracking code, this is a daunting task.
In fact, you can retag you code gradually. The trick is to set up a new Universal Analytics account to use for testing purposes while you are completing your retagging. The details are described in Appendix: A Gradual Approach to Upgrading Tracking Code .
Conclusions
Universal Analytics makes it possible to better understand modern user interaction with websites and apps. Today, the website conversion process (e.g., making a purchase) spans devices and sessions. It might include discovering your site on a mobile device, exploring your content on a tablet, and completing a transaction on a desktop. If you want to improve your site to work effectively for users across today’s multi-device interactions, the insights enabled by Universal Analytics are essential.
Appendix: A Gradual Approach to Upgrading Tracking Code
Many of us are not comfortable doing all the retagging in one shot, and with good reason. If the site is complex, or has a lot of custom tracking code, there is a good chance that a one-shot approach will introduce bugs and break tracking that we rely on for important analytics reports.
Ideally, we would like to make changes and test them before putting them into production. One approach to this would be to retag a page at a time. But, that is not possible on most modern websites. Most websites are built on frameworks (e.g., WordPress, Zend, Codeigniter, CakePHP). Framework based sites usually load the analytics in a single code block for all pages. Changing this block is required to retag, but it forces you to then retag all the pages.
You can solve this problem by setting up a test Universal Analytics account, running both classic and Universal tracking code during testing, and then switching your existing tracking ID into the retagged code.
Note that you want to keep your exiting account – and not switch over to the test account at the end of this process. That is important, because the existing account has all of your history. The new account is only for testing.
Here’s how it works. Create a new Universal Analytics account, and write your upgraded code right next to your existing code. You can safely run both classic Google Analytics and Universal Analytics on the same page (see: Multiple tracking codes on web pages ). Be careful to send the hits from the new code to your new account; and keep the old code firing away on the old account. When your retargeted tracking code is complete, you can replace new account number with the old one and delete the classic library and tracking code.
First, set up a test property. Our primary property is called Megalytic. We called our test property Megalytic (Universal), as shown below.

Next, start adding Universal tracking code for the test property. Leave your exiting classic tracking code in place. Here is the code (from our framework) that appeared on virtually every page of our site during the transition. It loads the tracking libraries and sends the basic pageview hit to both properties.
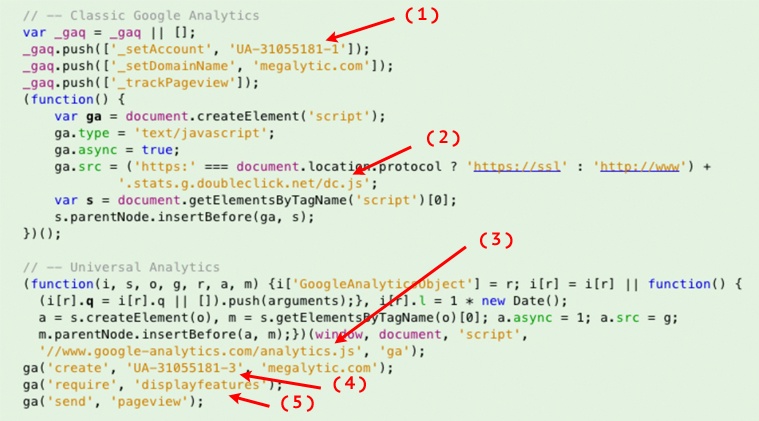
We’ve labeled the code to call out five points for understanding how this works.
- The classic Google Analytics code is using our primary Google Analytics property (UA-31055181-1).
- We are running the remarketing library, dc.js, so that we can get demographics data in our reports. This continues to work, even after upgrading our account to Universal Analytics.
- The Universal Analytics tracking code uses the analytics.js library.
- The new tracking code uses our new Universal Analytics property – created for testing (UA-31055181-3).
- To activate the Demographics and Interest Reports, we added this one line of code, as described by Google in Update Your Analytics Tracking Code to Support Display Advertising .
Once we had this code in place, we allowed it to collect pageviews for a few days, and checked that the test account data looked correct.
Next, we tackled retagging other parts of our custom tracking code, including:
- Goal Tracking
- eCommerce
- Events
- Custom Variables
We will cover the details in a future post. The important point to take away from this discussion is that, at the end of this process, you switch account IDs so that your retagged code starts sending hits to your existing account. This preserves your historical data. Before pushing to production, delete the old tracking code, or you will be sending duplicate data to Universal Analytics.
Once you have completed the switch, you can delete the test Universal Analytics account.