May 21, 2024
Landing Page Tracking with Google Tag Manager
By Megalytic Staff - September 18, 2015

Step 1 – Create a Google Tag Manager Container
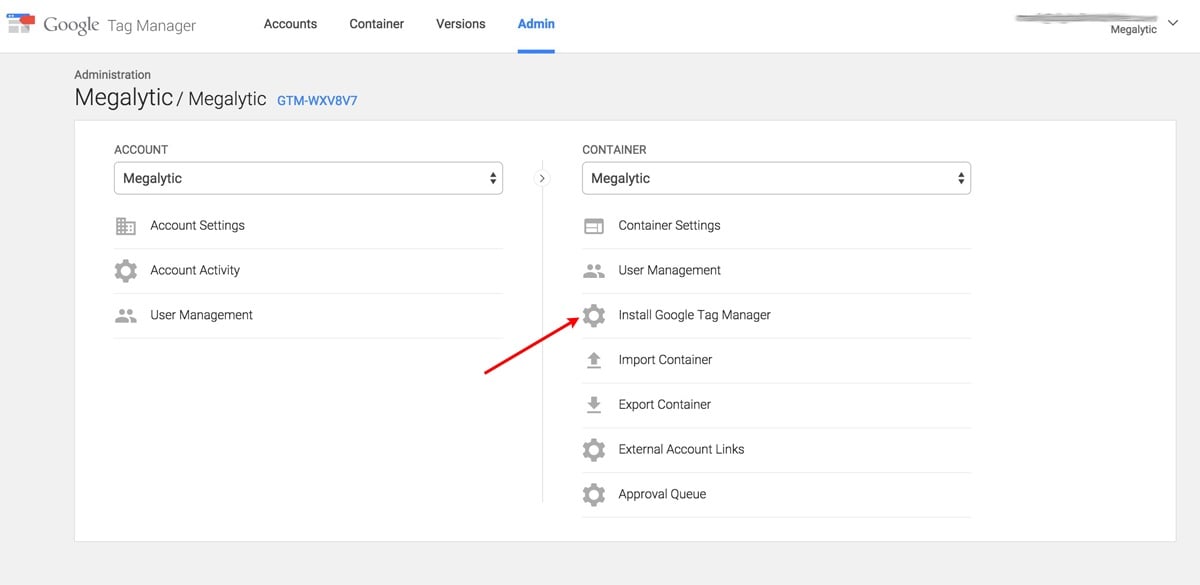
If you haven’t done so already, create a GTM container. Navigate to the Admin section, and click on the gear symbol next to “Install Google Tag Manager”.
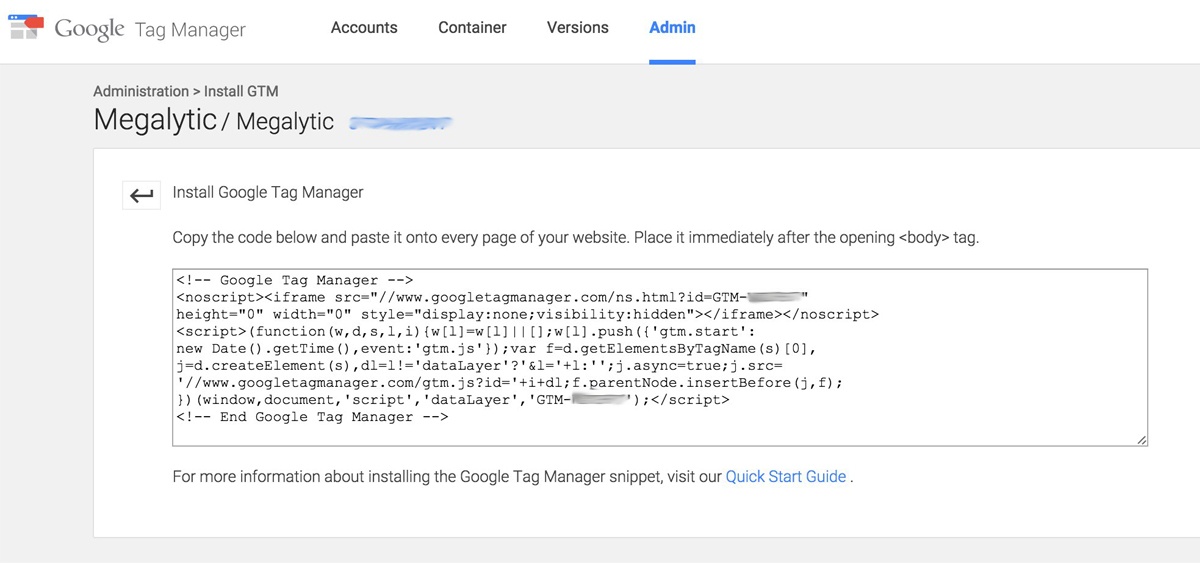
This will bring up a code snippet that you are going to add to the WordPress site that contains your landing pages.
Step 2 – Install Google Tag Manager on your WordPress Platform
For instructions on installing GTM, see our earlier post: How to Install Google Tag Manager in WordPress .
Once Google Tag Manager is installed, you can use it to deploy Google Analytics, Google Ads, Bing Ads, and other types of tracking on your landing pages. The beauty of using Google Tag Manger is that you don’t need to modify the code on your WordPress site any further to add these additional trackers. The deployment of additional trackers can be managed from Google Tag Manager simply by creating new Tags.
This magic happens because the GTM tracking code that is already on your site will dynamically load the JavaScript code required to implement any Tags that you create. So, when a user views your landing page, the GTM tracking code automatically loads whatever trackers you have configured (e.g., Google Analytics, Google Ads) and adds their tracking code to the page. For a more detailed description of how GTM works, visit the Tag Manager Help Center .
Now, let's take a look at how to configure Google Tag Manager to install Google Analytics and Google Ads.
Step 3 - Installing Google Analytics using Google Tag Manager
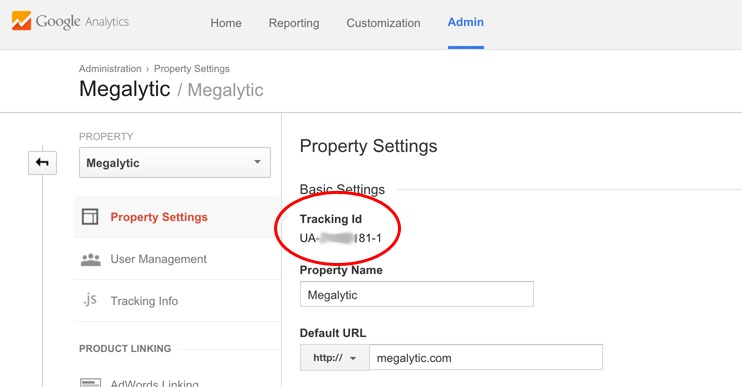
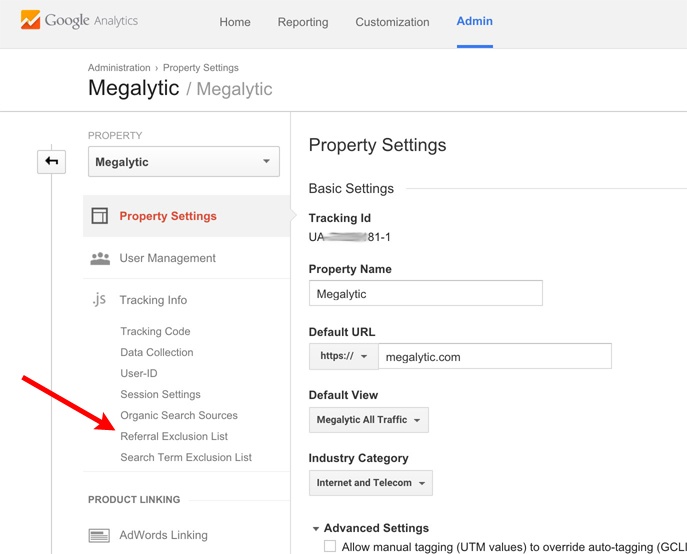
The next step is to configure Google Tag Manager to add Google Analytics to your landing pages. To add Google Analytics, you need to know your Tracking ID. To find that, log into Google Analytics, click on the Admin menu, and then click “Property Settings” under the Google Analytics property that you want to use for tracking your landing pages.
You then need to copy the Tracking ID you find here into the GTM Tag that you create for Universal Analytics. To do that, select “Tags” in GTM and click on “New”. Under “Choose Product” select “Google Analytics”. Next, under “Choose a Tag Type” select “Universal Analytics” and click “Continue”. Now, under the “Configure Tag” section, paste the GA Tracking Id into the “Tracking ID” field. Finally, under the “Fire On” heading, select “All Pages” – this will cause a Google Analytics page view to be fired on every page where you have installed GTM.
In our case, this means that every page in the sub-domain landing.megalytic.com will include Google Analytics tracking.
![]()
Managing Google Analytics Across Sub-Domains with Google Tag Manager
We have installed the same Google Tag Manager tracking code on our main website – megalytic.com . And, now we are running it on landing.megalytic.com as well. Without some extra configuration, this setup can cause problems. Specifically, whenever a user moves from landing.megalytic.com to megalytic.com (e.g., when they create a Megalytic account), Google Analytics will start a new Session on megalytic.com and list landing.megalytic.com as the referrer. We do not want that, because we want to treat this as one Session and capture the conversion, as well as the Source/Medium, Campaign, etc. that brought the user to the landing page in the first place.
To solve this, we need to configure Google Analytics to treat the hits on landing.megalytic.com and megalytic.com as part of the same Session. If you are not using Google Tag Manager, this configuration involves some confusing custom coding . But, with Google Tag Manager, there is a much simpler approach using Auto Link Domains . Here are the steps that we used.
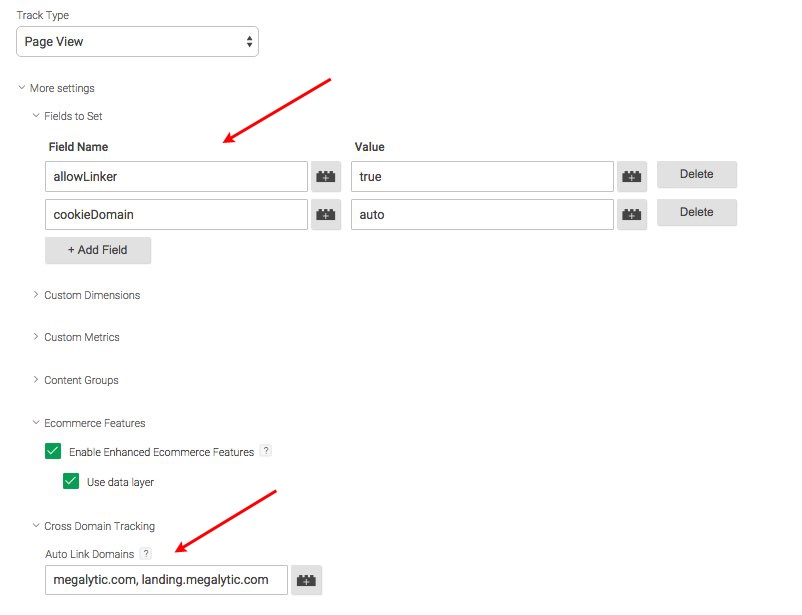
Going back to the Google Analytics Tag, click on the small pencil icon next to “Configure Tag” to edit the configuration. In order to integrate the landing page domain with the primary domain, set the Field named “allowLinker” to true, and “cookieDomain” to true. And, under “Cross Domain Tracking” enter both domains: landing.megalytic.com and megalytic.com.
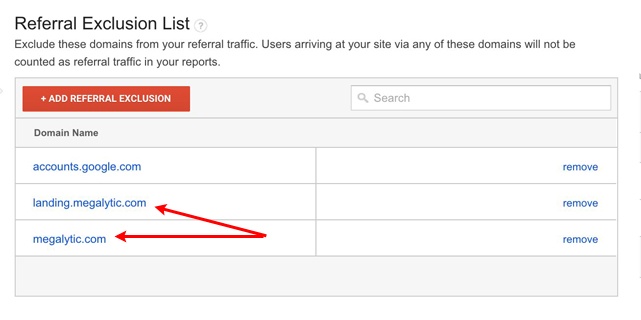
Next, you need to make some adjustments in your Google Analytics account. Head over to the Admin section of Analytics, and open the Property configuration (center column). Click on Referral Exclusion List to open a table where you can enter domains that are not allowed to be referral sources.
You need to add both your landing page domain and your primary domain to the Referral Exclusion List. That way, when a visitor moves from one domain to the other, in either direction, it will not overwrite the Google Analytics Source / Medium.
For example, if a visitor arrived on your landing page from clicking on a Google Ads ad, then the Source / Medium for that visit will be “google / cpc”. If you do not have your landing page in the Referral Exclusion List, and the visitor navigates to your main domain, then “landing.yourdomain.com / referral” will overwrite the “google / cpc” data and you will lose track of the fact that this Session can from Google Ads.
However, if you add the domains to the Referral Exclusion List as indicated here, then the true source of the visit – “google / cpc” – will be maintained.
Step 4 - Installing Google Ads Tracking using Google Tag Manager
Once Google Analytics is installed on your landing page, you may want to install additional tracking. For example, if you are driving traffic to your landing page from Google Ads, and your landing page includes a form for conversion, you will probably want to track Google Ads conversions.
To do that, all you need to do is create a Google Ads Conversion Tracking Tag and fire it on the “Thank You” page.
Detailed instructions are provided here: Setting Up Conversion Tracking in Google Ads .
Conclusions
Adding tracking to your landing pages is dramatically simplified by using Google Tag Manager. Particularly if your need to install Google Analytics and your landing pages are running on a different domain than your main website. That’s because Google Tag Manager reduces the once complex chore of implementing cross-domain tracking to a simple configuration exercise. In addition, Google Tag Manager makes it easy to add additional tracking code (e.g., Google Ads, Bing Ads) to your landing pages without any additional coding.