
May 21, 2024
Advantages and Uses of Google Analytics Filters
By Megalytic Staff - August 08, 2014

Filters are Applied to Views
Filters work together with Views , to isolate a subset of your data. Note that, here, the term “Filter” is short-hand for “View Filter,” which should not be confused with the filters that can be added to custom reports .
Views act like duplicate copies of your analytics data that you set up for a specific purpose, such as looking at only visits that land on a blog page. You apply one or more Filters to customize the View to report on only the traffic related to the View’s purpose. For example, you can set up Filters to include only data from a specific source (e.g., visits from China, logged in users). Filters can also be defined to exclude specific types of data (e.g., bounce visits, visits from spiders or bots).
View Filters are similar to Advanced Segments except that Filters are permanent. They are applied during data collection for a View so that the unwanted data never gets stored in that View. Advanced Segments, on the other hand, work with reports and restrict the data shown in a particular report. Segments can be turned on and off. Use Filters when you need a View where all the reports show only the filtered data.
Advantages of Using Filters
One advantage of using Filters (as opposed to Segments) is data security. Sometimes, you want to provide access to some, but not all, of your analytics data. For example, suppose you want to give the editorial team access to analytics reports about the company blog, but restrict access to data from the rest of the site (e.g, Ecommerce data). In this situation, you would create a “Blog Only” View by applying a Filter that restricts data to only Blog Pageviews.
Another advantage is convenience. You can often achieve the same results in your reports by applying Segments. But, if you consistently need to look at a particular subset of the data (e.g., visits from China), then it is much easier to have a Filtered View that is dedicated to that data. It is also easier for users, who may not be completely fluent in Google Analytics, to simply tell them to look at a particular Filtered View, rather than teaching them how to work with Segments.
Also, note that Filters and Segments do not produce exactly the same results. To understand the differences, I suggest reading The key difference between segments and filters blog post by Analytics Canvas.
Lastly, Filters are the only way to include or exclude traffic from specific IP addresses. Since Google considers the IP address to be personally identifiable information, it is not available in your reports, and you cannot create Segments based on IP address.
Always Keep One Unfiltered View
Because Filters permanently restrict that data stored in a View, it is important to always keep one View that has no Filters. This view is commonly named “All Website Data.” This way, you always have a complete record of your data. For example, if you were to set up a view named “Non-Purchasers” with a Filter to exclude all visits that include a purchase, you would want to make sure you also had another View where all the purchases were being tracked. By always having at least one unfiltered View, you know that you are covered.
Creating a Filter
To create a Filter, open the Admin section, select the View you want to filter, select “Filters,” and click on “+ New Filter.”
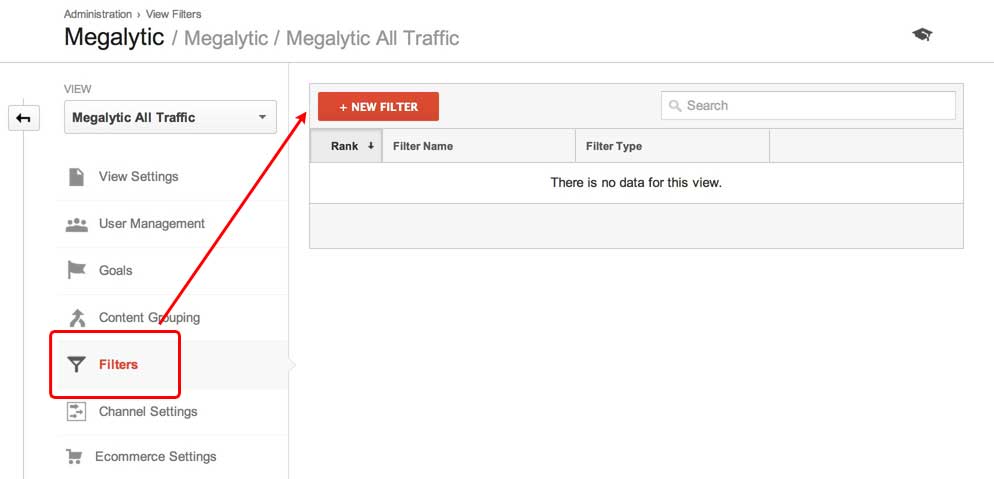
You will then be presented with a configuration screen for setting up your Filter. Select the “Create a new Filter” option. Give your Filter a name and select “Predefined filter” or “Custom filter.” There are a variety of options for both predefined and custom. Check out
The Ultimate Guide to Google Analytics Profile Filters
for a detailed explanation of all these options. (Note that when this article was written, Google was using the term “Profile” for what they now call a “View”).
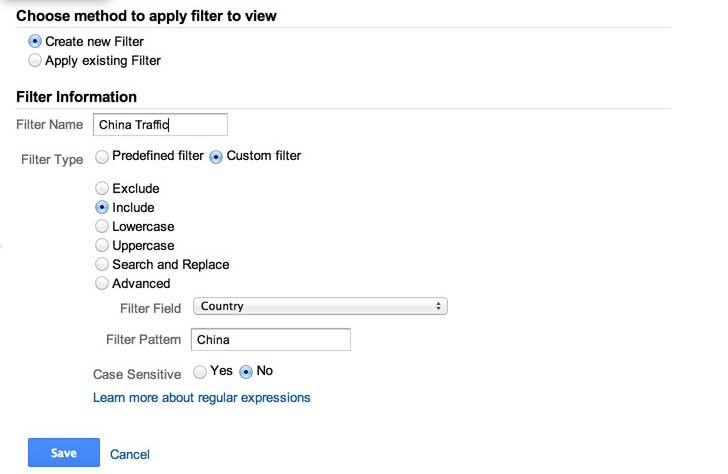
For example, here is a Filter that includes only data from visits coming from China.
When you first create a Filter, you should try it out on a test View first. This way, if you make a mistake, you will not corrupt the data in one of your existing Views.
Now that you know how to create a Filter, lets take a look at some of the more useful kinds of Filters you might want to use to analyze your website.
Filter Your Internal Traffic
Unless you are testing your analytics tracking setup, you usually don’t want visits from your own company showing up in your reports. These internal visits, from developers, editors, testers, etc., can skew your numbers. For example, when testing your checkout process, you don’t want test purchases to show up in your Ecommerce reports.
Typically, we set up an “External Only” view and exclude traffic from our internal company IP addresses. To do this, you first need to determine what your internal IP addresses are. You can ask your network administrator, or use a service like what’s my ip . If you work for a small company, you may only have one internal IP address. However, most companies use a range of internal IP addresses.
The filter below is set up to screen out the range 88.107.34.0 – 88.107.34.15.
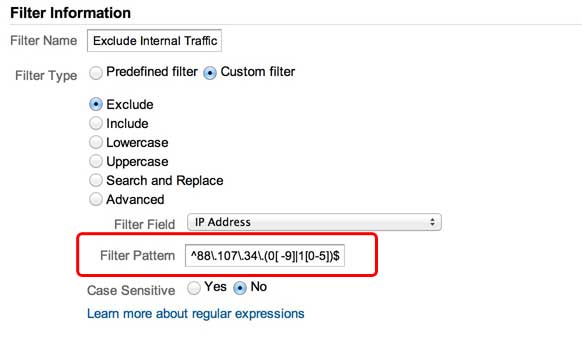
Note that I selected “Exclude” and defined the range of IP addresses using a regular expression for the “Filter Pattern.” Dealing with regular expressions is a stumbling block for many of us. Luckily, there are a number of resources on the web that can help us to translate an IP range into a regular expression. For this example, I used the free IP Range Regular Expression Builder provided by AnalyticsMarket.
Dynamic IP Addresses
The example above works only if your internal traffic comes from static IP addresses – i.e., the address (or range) does not change. However, if your employees log in from home, or on the road, then chances are their traffic is coming from dynamic IP addresses, and there is no way to know in advance where they are coming from and filter them out using an IP address. Even if they are accessing the web from a static IP address at a hotel, you are unable to know what that IP address is in advance, and filter it out. In this situation, you need to use a different approach to identify and filter this internal traffic.
The simplest approach that I’ve seen to solving this problem is described blog post by Matraxis. The idea is to direct your employees to always access the company website by first going to a special URL, like this:
www.yourdomain.com/?utm_source=internal-traffic
This sets the campaign source for the visit to the unique value “internal-traffic” used to identify visits from company employees. Make sure you use a unique value for this utm_source parameter, or else you will end up filtering out some external visits, along with your internal visits.
In order for this to work, all your employees need to remember to access your site via this link. You can make it easier for them by creating a more memorable URL like www.yourdomain.com/internal and having this URL redirect to www.yourdomain.com/?utm_source=internal-traffic .
Now, it is unlikely that everyone will remember to use this special URL all the time, so some internal traffic is probably going to slip through the cracks. But, this approach will go a long way to reducing the internal traffic that shows up in your reports.
The filter for this approach excludes traffic with the Campaign Source set to the unique value “internal-traffic.”
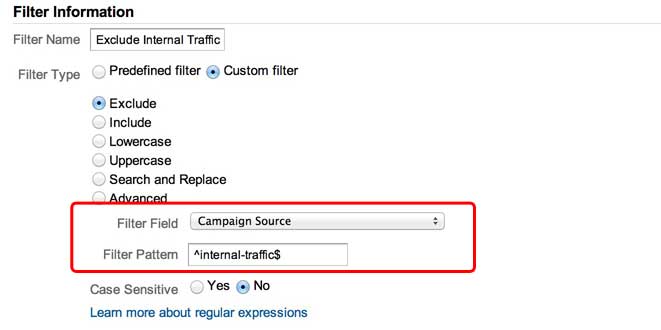
Here, the string “^internal-traffic$” is the regular expression that exactly matches “internal-traffic.” Creating a Custom Filter often involves working with regular expressions, and if you want to get up to speed, check out Google’s reference guide: About regular expressions .
Filters for Sub-Domains or Directories
Another typical use of Filters is to create a View containing only data for traffic to a particular sub-domain or directory within your site. For example, you may want to have a View that contains only blog traffic.
Here is the Filter that we use to create our “Megalytic Blog Only” View.
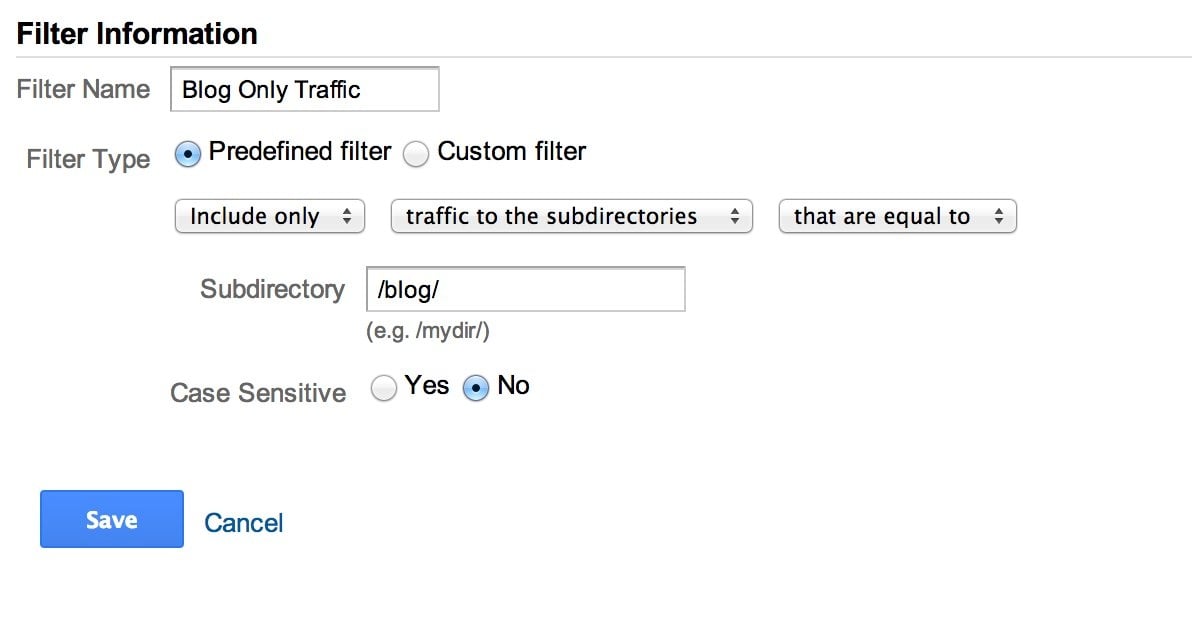
In this case, we are able to use the “Predefined filter” option and simply specify the blog directory for inclusion. All hits from visits to page paths that do not start with “/blog/” will be filtered out of this View.
Filters for Super Users
You may also want to create a Filtered View for traffic from particularly important Users or Sessions. For example, we have a View that shows only traffic from logged in Users. We use this View to analyze the behavior of people who are using the Megalytic product, as opposed to browsing the site or reading the blog.
One way to do this is to create a custom dimension that will flag the Sessions from your “Super Users.” You will also need to add tracking code to your site that sets the custom dimension . For this part, you may need some assistance from your web developer(s).
Once the custom dimension is set up and tracking, you can create a View Filter to include only Sessions where that custom dimension has been set. At Megalytic, we use a custom dimension named “UserId” to identify Users who have created Megalytic accounts. Here is what our Filter definition looks like.
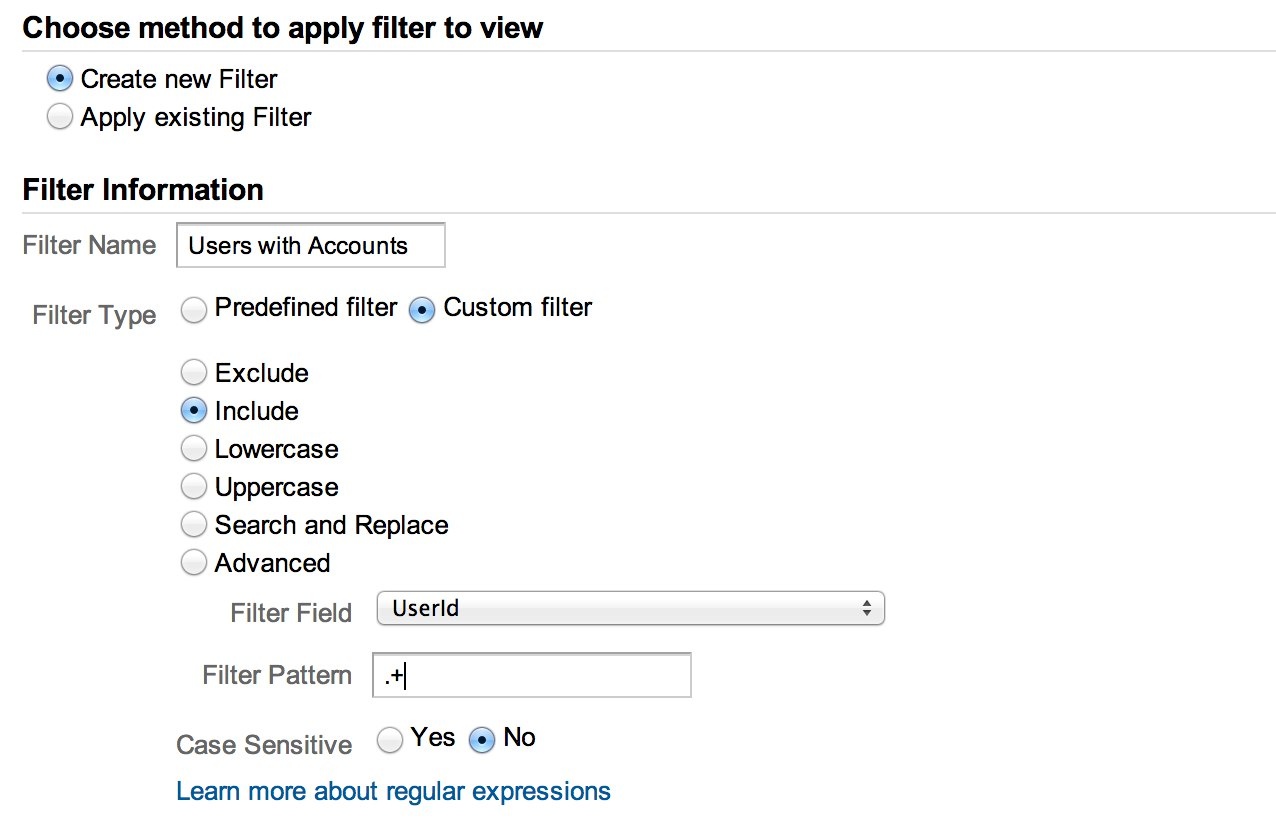
Here, we have used the regular expression “.+” to match any non-empty string. As long as the UserId custom dimension has been set, the User has an account, and we want to include his traffic in this View.
Filter Traffic from Bots and Spiders
Bots and spiders (also known as crawlers ) of various kinds visit your website on a regular basis. Without filtering, these visits can show up in your Google Analytics reports. For example, the Seamalt crawler is the 22nd largest source of data shown in this unfiltered view of the Megalytic website.

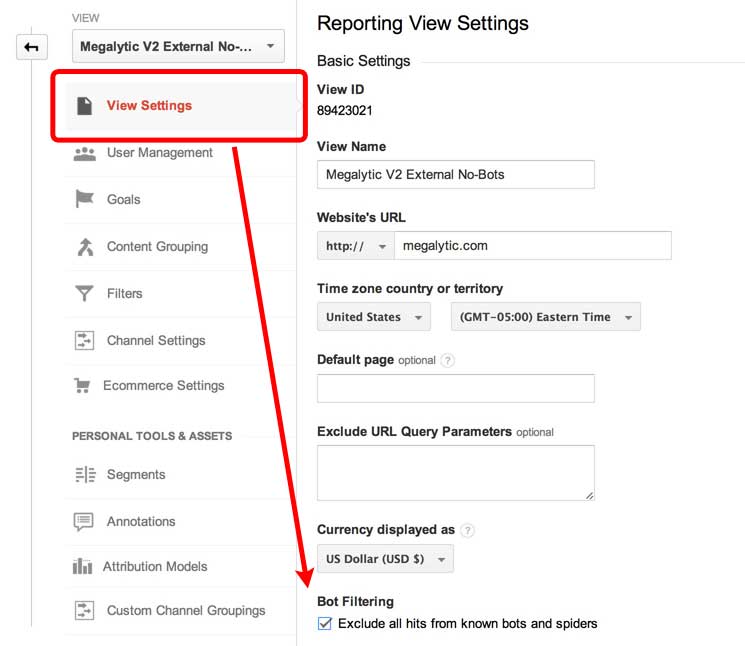
Luckily, Google has recently released a special filter that you can use to remove bot and spider traffic from your reports. To activate this filter, click on Admin and select the View that you want to filter. Click on “View Settings” and select “Bot Filtering.”
By filtering out these crawler visits, you will typically see an improvement in your Bounce Rate, Pages per Session, Avg Visit Duration and Conversion Rates. It’s a simple way to make your reports more accurately reflect the behavior of your real visitors.
Conclusion
Using Analytics Filters enables you to create specialized Views to focus on specific types of data. Filters can be used to restrict unwanted traffic from your reports, or to perform a deep dive into the traffic you wish to analyze more closely. The value of Filters is to give you, and your marketing team, a clearer picture of how your website and larger marketing campaigns are performing by highlighting the data that matters and removing noise from your reports.